
How To Setup Postfix, Postfix w/TLS and DKIM
References:
- Installing Postfix
- Postfix
- How to secure Postfix using Let’s Encrypt
- https://serverfault.com/questions/750902/how-to-use-lets-encrypt-dns-challenge-validation
- Installing OpenDKIM RPM via Yum with Postfix
- connect to Milter service inet:127.0.0.1:8891: Connection refused
- can’t load key in OpenDKIM Permission denied
Install Postfix
On the ubuntu server, run:
sudo apt-get update

sudo apt-get install postfix -y
You will be asked to select a type for mail configuration. Choose Internet Site.
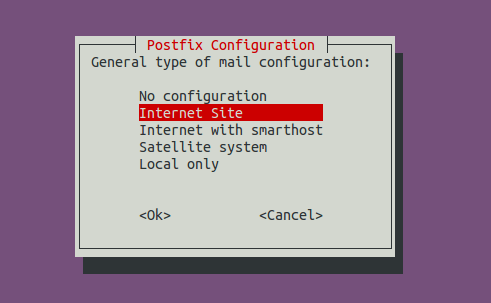
- No configuration means the installation process will not configure any parameters.
- Internet Site means using Postfix for sending emails to other MTAs and receiving email from other MTAs.
- Internet with smarthost means using postfix to receive email from other MTAs, but using another smart host to relay emails to the recipient.
- Satellite system means using smart host for sending and receiving email.
- Local only means emails are transmitted only between local user accounts.
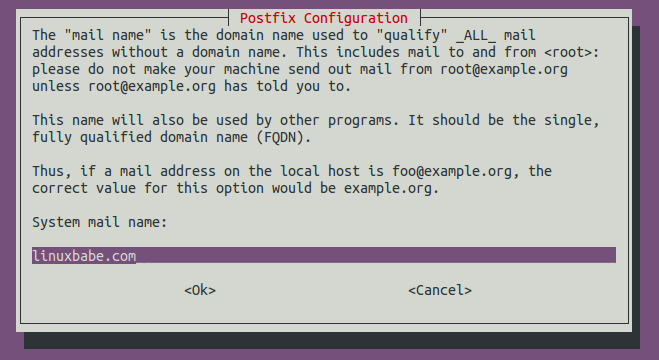
Next, enter the domain name for the system mail name, i.e. the domain name you want to display after the @ symbol. For example, I want my email to be alex@mydomain.com, so I should put mydomain.com here. This domain name will be appended to addresses that doesn’t have a domain name specified.
Once installed, Postfix will be automatically started and a /etc/postfix/main.cf file will be generated. Now we can check Postfix version with this command:
postconf mail_version
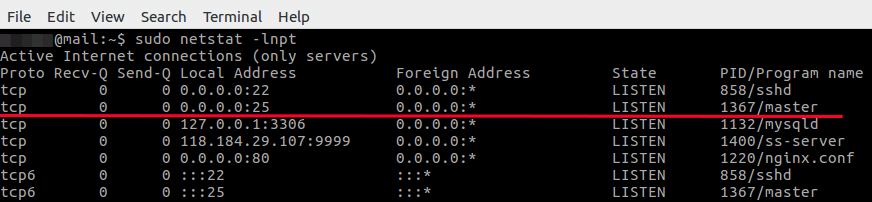
The netstat utility tells us that the Postfix master process is listening on TCP port 25.
sudo netstat -lnpt
Postfix ships with many binaries under the /usr/sbin/ directory, as can be seen with the following command.
dpkg -L postfix | grep /usr/sbin/
Output:
/usr/sbin/rmail
/usr/sbin/sendmail
/usr/sbin/posttls-finger
/usr/sbin/smtp-sink
/usr/sbin/postfix-add-filter
/usr/sbin/postdrop
/usr/sbin/postconf
/usr/sbin/postsuper
/usr/sbin/qshape
/usr/sbin/postfix-add-policy
/usr/sbin/postkick
/usr/sbin/smtp-source
/usr/sbin/postfix
/usr/sbin/postmulti
/usr/sbin/qmqp-source
/usr/sbin/postlock
/usr/sbin/postqueue
/usr/sbin/postlog
/usr/sbin/postalias
/usr/sbin/postmap
/usr/sbin/qmqp-sink
/usr/sbin/postcat
Port 25 Connectivity
Enable Inbound Traffic for Port 25
Ubuntu doesn’t enable a firewall by default. If you have enabled the UFW firewall, you need to open port 25 (inbound) with the following command, so Postfix can receive emails from other SMTP servers.
sudo ufw allow 25/tcp
Port 25 Inbound Connectivity
Install nmap
sudo apt install nmap
Then use nmap to scan open ports on our server. Run the following command. Replace your-server-ip with actual IP.
sudo nmap 207.246.110.31

Port 25 Outbound Connectivity
Run the following command on your mail server to check if port 25 (outbound) is blocked.
telnet gmail-smtp-in.l.google.com 25
If it’s not blocked, you would see messages like below, which indicates a connection is successfully established. (Hint: Type in quit and press Enter to close the connection.)
Trying 74.125.68.26...
Connected to gmail-smtp-in.l.google.com.
Escape character is '^]'.
220 mx.google.com ESMTP y22si1641751pll.208 - gsmtp
Config Postfix
To configure postfix, run the following command:
sudo dpkg-reconfigure postfix
choose internet site as we did in a previous step.
enter a system mail name. If you want your email to look like user@mydomain.com, then put mydomain.com there. If you want it to be user@mail.mydomain.com, then put mail.mydomain.com there.
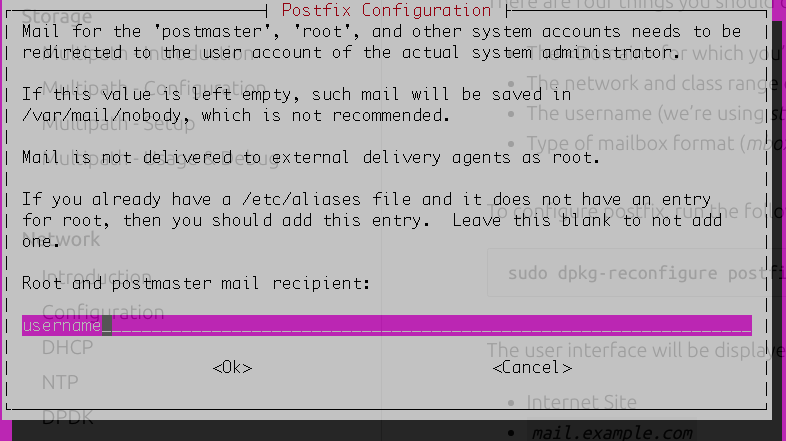
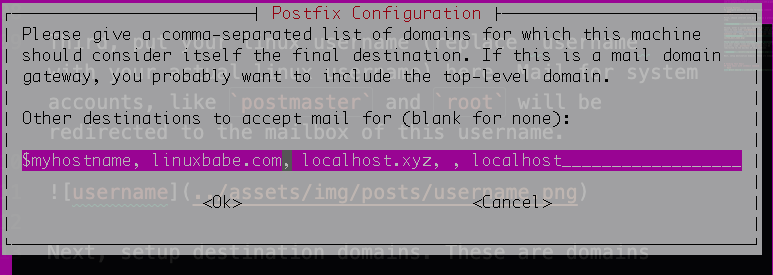
put your linux username (replace “username” with your actual linux username) here. Mail for system accounts, like postmaster and root will be redirected to the mailbox of this username.
setup destination domains. These are domains for which your machine will consider itself as the final destination (aka it will keep the email locally). Normally, you want to make sure that the system mail name you setup in the second step is in destination domains.
- Force synchronous updates on mail queue?
No - Local networks:
127.0.0.0/8 [::ffff:127.0.0.0]/104 [::1]/128 - Mailbox size limit (bytes):
0 - Local address extension character:
+ - Internet protocols to use:
allThe configuration is saved to /etc/postfix/main.cf. To manually configure postfix, use the command sudo vim /etc/postfix/main.cf. You could also use postconf to configure postfix. For example:
To configure the mailbox format for Maildir:
sudo postconf -e 'home_mailbox = Maildir/'
This will place new mail in /home/username/Maildir.
Sending Test Email
Run the following command:
echo "test email" | sendmail your-account@gmail.com
If you fail to send the email, you should check the log file at /var/log/mail.log to see what went wrong.
Setup TLS with Postfix
Creating DNS records
The first step in setting up a trustworthy email server is to create the required domain name and mail exchanger records.
The records that you will need to configure in you zone file:
- DNS A record, that maps your domain name to the server’s public IP address.
example.com. IN A 83.136.253.111 - MX record, which will tell other mail servers where messages send to your domain should be delivered.
example.com. 300 IN MX 1 mx.example.com.
Getting Let’s Encrypt certificates
Enabling the TLS will require you to obtain certificates. Let’s Encrypt is a free, automated, and open Certificate Authority that allows easy certificate setup using the Certbot ACME client from the Electronic Frontier Foundation.
- Start by installing the Let’s Encrypt module.
sudo apt install certbot - Run the command below to request a certificate. Replace example.com with the system mail name you defined in previous section.
sudo certbot -d example.com --manual --preferred-challenges dns certonly - Enter your email and read terms of service.
- You will then be required to put a piece of txt record into your dns
Please deploy a DNS TXT record under the name _acme-challenge.example.com with the following value: value - Put this value as a TXT record into your zone file and hit continue. Replace value with the actual token you get.
_acme-challenge.example.com 300 IN TXT "value"Once you have finished the process, the certificates will be stored under /etc/letsencrypt/live/your.domain/. . You can add your new certificates to the Postfix configuration using the two commands below. Replace the your.domain with your system mail name defined in previous step.
sudo postconf -e 'smtpd_tls_cert_file = /etc/letsencrypt/live/<your.domain>/fullchain.pem'
sudo postconf -e 'smtpd_tls_key_file = /etc/letsencrypt/live/<your.domain>/privkey.pem'
With the certificate installed, you can configure the rest of the email server.
Setting up SMTP authentication
Configure Postfix to provide TLS encryption for both incoming and outgoing mail.
sudo postconf -e 'smtp_tls_security_level = may'
sudo postconf -e 'smtpd_tls_security_level = may'
sudo postconf -e 'smtp_tls_note_starttls_offer = yes'
sudo postconf -e 'smtpd_tls_loglevel = 1'
sudo postconf -e 'smtpd_tls_received_header = yes'
Sending Test Email Again
Run the following command:
echo "test email" | sendmail your-account@gmail.com
Setup DKIM with Postfix
Install OpenDKIM
- Start by install opendkim
sudo apt install opendkim sudo apt install opendkim-tools - We then need to generate keys for signing. Manually create your keys with the following command. Replace example.com with the system mail name you defined.
mkdir /etc/opendkim/keys/example.com sudo opendkim-genkey -D /etc/opendkim/keys/example.com/ -d example.com -s default sudo chown -R root:opendkim /etc/opendkim/keys/example.com sudo chmod 640 /etc/opendkim/keys/example.com/default.private sudo chmod 644 /etc/opendkim/keys/example.com/default.txt sudo chmod -R ug+x /etc/opendkim - You’re getting really close now. You need to create and/or edit four files:
- /etc/opendkim.conf – OpenDKIM’s main configuration file
- /etc/opendkim/KeyTable – a list of keys available for signing
- /etc/opendkim/SigningTable – a list of domains and accounts allowed to sign
- /etc/opendkim/TrustedHosts – a list of servers to “trust” when signing or verifying
- Use your favorite text editor to open /etc/opendkim.conf and make it look like this:
## CONFIGURATION OPTIONS # Specifies the path to the process ID file. PidFile /var/run/opendkim/opendkim.pid # Selects operating modes. Valid modes are s (signer) and v (verifier). Default is v. Mode sv # Log activity to the system log. Syslog yes # Log additional entries indicating successful signing or verification of messages. SyslogSuccess yes # If logging is enabled, include detailed logging about why or why not a message was # signed or verified. This causes a large increase in the amount of log data generated # for each message, so it should be limited to debugging use only. #LogWhy yes # Attempt to become the specified user before starting operations. UserID opendkim:opendkim # Create a socket through which your MTA can communicate. Socket inet:8891@127.0.0.1 # Required to use local socket with MTAs that access the socket as a non- # privileged user (e.g. Postfix) Umask 002 # This specifies a file in which to store DKIM transaction statistics. #Statistics /var/spool/opendkim/stats.dat ## SIGNING OPTIONS # Selects the canonicalization method(s) to be used when signing messages. Canonicalization relaxed/simple # Domain(s) whose mail should be signed by this filter. Mail from other domains will # be verified rather than being signed. Uncomment and use your domain name. # This parameter is not required if a SigningTable is in use. Domain example.com # Defines the name of the selector to be used when signing messages. Selector default # Gives the location of a private key to be used for signing ALL messages. #KeyFile /etc/opendkim/keys/default.private # Gives the location of a file mapping key names to signing keys. In simple terms, # this tells OpenDKIM where to find your keys. If present, overrides any KeyFile # setting in the configuration file. KeyTable refile:/etc/opendkim/KeyTable # Defines a table used to select one or more signatures to apply to a message based # on the address found in the From: header field. In simple terms, this tells # OpenDKIM how to use your keys. SigningTable refile:/etc/opendkim/SigningTable # Identifies a set of "external" hosts that may send mail through the server as one # of the signing domains without credentials as such. ExternalIgnoreList refile:/etc/opendkim/TrustedHosts # Identifies a set internal hosts whose mail should be signed rather than verified. InternalHosts refile:/etc/opendkim/TrustedHosts - create an /etc/opendkim/KeyTable file that looks like this:
default._domainkey.example.com example.com:default:/etc/opendkim/keys/example.com/default.privateWhat this line means is that for key entry default._domainkey.example.com, use the key at /etc/opendkim/keys/example.com/default.private with signing domain example.com and selector default
- you need to create or edit the /etc/opendkim/SigningTable file.
*@example.com default._domainkey.example.comThis specifies that we will sign any email from example.com, with the key default._domainkey.example.com. You could also have multiple lines here:
*@example.com default._domainkey.example.com bob@example2.com default._domainkey.example2.com doug@example2.com default._domainkey.example2.com - Next, create an /etc/opendkim/TrustedHosts file that looks like this:
 127.0.0.1
 hostname1.example1.com
 hostname2.example1.com
 example1.com
 hostname1.example2.com
 hostname2.example2.com
 example2.com
The TrustedHosts file tells OpenDKIM who to let use your keys. IMPORTANT: Make sure you list the IP address for localhost (127.0.0.1) in the TrustedHosts file or OpenDKIM won’t sign mail sent from this server. If you have multiple servers on the same network that relay mail through this server and you want to sign their mail as well, they must be listed in the TrustedHosts file.
- Edit /lib/systemd/system/opendkim.service file, change the line that starts with ExecStart=/usr/sbin/opendkim -P to the following:
ExecStart=/usr/sbin/opendkim -P /var/run/opendkim/opendkim.pid -p inet:8891@127.0.0.1You might also need to edit /etc/default/opendkim and change the line that starts with SOCKET to:
SOCKET="inet:8891@127.0.0.1"
Edit Postfix Configuration
Just add the following lines to your Postfix /etc/postfix/main.cf file:
smtpd_milters           = inet:127.0.0.1:8891
non_smtpd_milters       = $smtpd_milters
milter_default_action   = accept
- Optionally: change Postfix’s queuing settings:
 # if you can't deliver it in a day - it can't be delivered!
 maximal_queue_lifetime = 25h
 maximal_backoff_time = 13h
 minimal_backoff_time = 10h
 queue_run_delay = 10m
Restart Service
Restart opendkim and postfix
sudo systemctl start opendkim
sudo systemctl restart postfix
Check that opendkim is running
sudo systemctl status opendkim
Adding DNS Records
Now that your mail server is signing outgoing mail and verifying incoming mail, you’ll need to put some information in your DNS records to tell other mail servers how your keys are set up, and provide the public key for them to check that your mail is properly signed. Do:
sudo cat /etc/opendkim/keys/example.com/default.txt
The output should look something like this:
default._domainkey IN TXT ( "v=DKIM1; k=rsa; "
          "p=MIGfMA0GCSqGSIb3DQEBAQUAA4GNADCBiQKBgQDHY7Zl+n3SUldTYRUEU1BErHkKN0Ya52gazp1R7FA7vN5RddPxW/sO9JVRLiWg6iAE4hxBp42YKfxOwEnxPADbBuiELKZ2ddxo2aDFAb9U/lp47k45u5i2T1AlEBeurUbdKh7Nypq4lLMXC2FHhezK33BuYR+3L7jxVj7FATylhwIDAQAB" )  ;
          ----- DKIM default for example.com
Put this TXT record into your zone file.
Testing Things Out
Send a test email
echo "test email" | sendmail your-account@gmail.com
The best way to see that everything is working on the server side is to keep an eye on your /var/log/maillog file. Do a:
sudo tail /var/log/maillog
When OpenDKIM starts (or restarts), you should see lines like:
opendkim[4397]: OpenDKIM Filter: mi_stop=1
opendkim[4397]: OpenDKIM Filter v2.10.1 terminating with status 0, errno = 0
opendkim[27444]: OpenDKIM Filter v2.10.1 starting (args: -x /etc/opendkim.conf)
When you send a mail that gets successfully signed, you should see:
opendkim[22254]: 53D0314803B: DKIM-Signature header added